
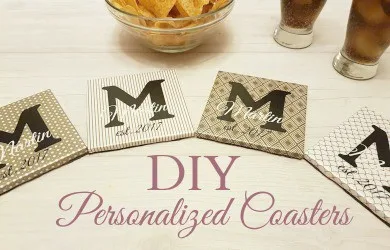
Learn how to make personalized coasters as a fun and unique gift for any celebration or occasion. Creating something that you can customize in so many different ways makes the gift even more special.
Don’t have the need for a gift coming up? That’s ok too. Make them for your home as part of a way to spruce up your home decor. Or even, (see my thoughts at the bottom of this post) as great options if you own or run a business!

DIY Personalized Coasters – PIN IT for later!
When it comes to creating unique and fun gift ideas, I almost always turn to my Cricut Explore Air for assistance. These DIY Personalized Coasters are no exception. Using my Cricut keeps the lines smooth and precise every time.
If you don’t have access to a Cricut, that is perfectly fine. You can get the same look with a good old-fashioned pair of scissors, it just may take a little more time.
These DIY Personalized Coasters are perfect for:
- Dinner parties
- Bar coasters
- Wedding presents
- Personalized gifts
- Christmas presents
- Gifts for pet lovers
- Welcome presents for guests
- Special events
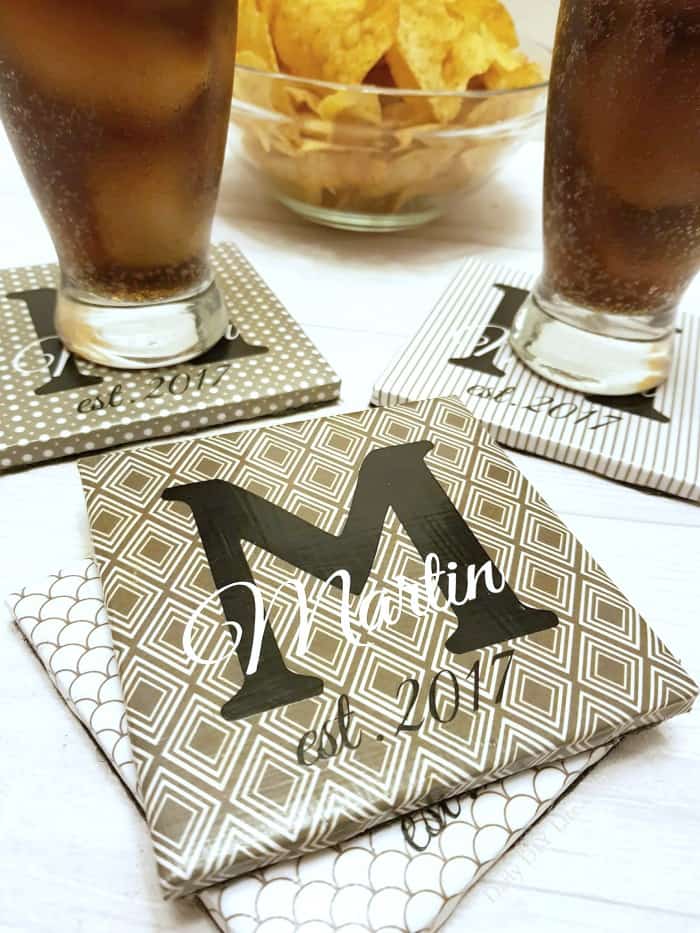
They are also stunning additions to any coffee table and under any drinks. Let me show you just how easy these custom coasters are to create.
How To Make Personalized Coasters
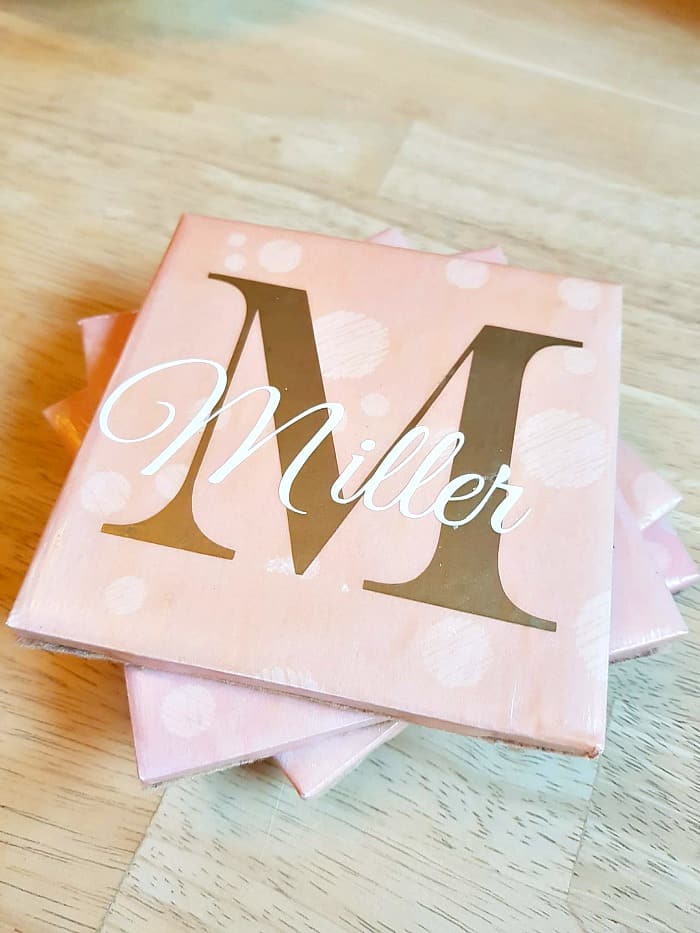
Great question! The first set of Personalized Custom Coasters I made was for a wedding gift. I used my Cricut to cut out the large initial and their last name, as well as the established date. You can add anything you like to the top of your coasters, favorite sports team, photos of the family, favorite memories, the possibilities are pretty endless.
Just make sure the image, decal or stickers you are applying lay flat. This is very important depending on the type of material or custom image you are using. For example, if it is a raised image, the coasters won’t be very sturdy for a glass filled with liquid.

Supplies You’ll Need For DIY Personalized Coasters
- (4) 4-inch plain white tiles
- Mod Podge
- Foam Paint Brush
- Decorative Paper(scrapbook paper, wrapping paper, napkins etc.)
- Decal or Stickers
- Felt
- Hot Glue
- Scissors
If you have Cricut Design Space, You can download the pattern to cut and score 4 squares of any material at once.
Before we get started, there are a few things to keep in mind while creating these coasters. They include:
- Condensation is your worst enemy when making these. Don’t let that scare you away though! Just be careful you are in a cool dry room and keep anything you may be drinking far away.
- The sky is your limit when it comes to what artwork you want to include. Whether it’s custom images, original art or family photos, the options are endless.
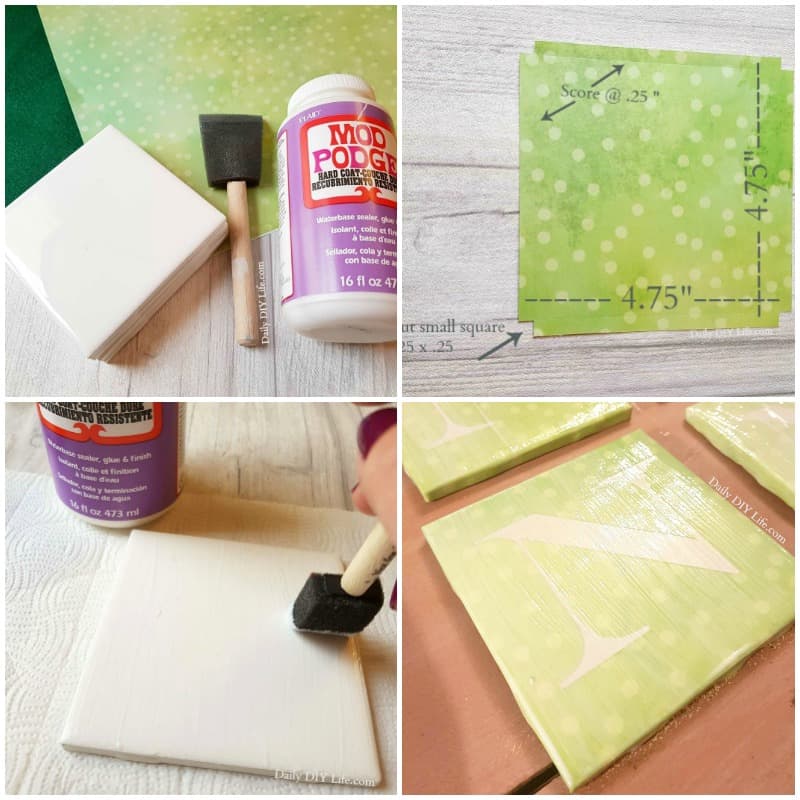
How To Make Custom Tile Coasters
- Cut 4 squares from your favorite decorative paper. The dimensions should be: 4.75″ x 4.75″.
- Score and fold .25 inches from the edge on all 4 sides.
- Cut out a small square .25″ x .25″ out of all four corners (see image)
- Generously apply Mod Podge to the entire surface of the tile you are using.
- Place the paper on top of the tile, folding down the sides at the score lines. Add more Mod Podge as needed to secure down the sides. Smooth out with your fingers to remove any air bubbles.
- Once the paper has dried slightly, apply your decal or stickers to the top of your tile however you like it.
- Apply 2 generous coats of mod podge over the top and sides of your tile. Let the mod podge dry between each coat.
- Cut 4 squares of coordinating felt 4″ x 4″.
- Once the mod podge has dried completely, flip your coaster over and hot glue the felt to the back side of the coasters. This will keep it from scratching your surface.
Since learning how to make personalized drink coasters, I’ve made quite a few sets. Wedding gifts and Birthday gifts are my favorite ones to make. If the name is a bit long (like mine) you can add a favorite photo or just the large initial like the green ones I made for my own personal use.
These pink Birthday ones are my favorite. I just adore the soft pink with the gold and white. You all know how much I adore the color pink! Another great idea is to tweak this idea and create photo coasters.
Follow Daily DIY Life on Pinterest!
Love These Coasters?
There are a ton of other uses for creating custom coasters. Think of the business options! They are great opportunities for displaying brands and any logo. As well as:
- Special events
- Restaurants
- Corporate gifts
- A great gift for customers
- Custom products for clients
- Trade shows
- Use them as business cards!
- Any special business event or occasion
If you love this project, you may also love some of our other favorite DIY projects. Check out a few below.

DIY Kitchen Magnets To Match Any Decor
Until next time! And if you need something to do, check our recent post on file folding, your ultimate laundry hack.


Now these coasters are for sure a wonderful gift for weddings and birthdays. I do love them. They look so elegant and I am sure mean something special to the newlyweds.
They were a big hit. Super fun to make too.
These coasters are so cute! What a great gift they would make too. I love how personalized they are!
Thank you! They are very easy and fun to make
How do you clean the sides of the tile? I bought some white ones at Home depot and they have some ceramic bumps on the side?
Hope this makes sense.
TY
I just covered mine with the decorative paper. I would imagine you could buy sandpaper that was made for ceramic and give them a scrub.
Great post! Thanks for sharing very powerful post.
Customized coaster
Hello and I appreciate you taking the time to answer my question. I want to be able to create my own sayings on tile coasters and can you let me know how I go about this using my cricut. I believe I would need a laser printer for this, but is there a way to use my design space for the creation of the wording. I can’t seem to find any sites that help with this step.
I do not want to use stamps, I want to use my own original work.
Can you help me with this? Thank you!
Julie 🙂
There are many fonts available in Cricut design space that you can create text files and cut out using permanent vinyl. No laser printer is needed. I don’t do specific tutorials, but there are many available on how to cut vinyl and how to create personalized coasters. Have fun with it. good luck
Do you have to put a sealer on them. What about something hot on them and are they sticky?
These are truly beautiful.
Peggy
Hi Peggy! Great question. You do not need to because Mod Podge does it for you. It’s actually a combo glue/sealer. Let us know how they come out 🙂
Do you have to use a certain type of mod podge?