Have you ever gotten a gift of delicious mouth watering fruit, arranged so perfectly and designed to perfection?
I received one of these lovely bouquets for my birthday a few years back. It was simply divine! The fruit was so juicy and perfectly ripe I was in heaven.
A few months later I went to send a gift to a friend, so I decided one of these adorable fruit arrangements would be perfect….. Until I saw the price!
I was actually quite shocked at how pricey they were. And I knew I could make something equally gorgeous and for at least half the price. So I did!
I’ve made a few of these arrangements over the last year, and each one I like just a little more than the last. Practice makes perfect maybe?
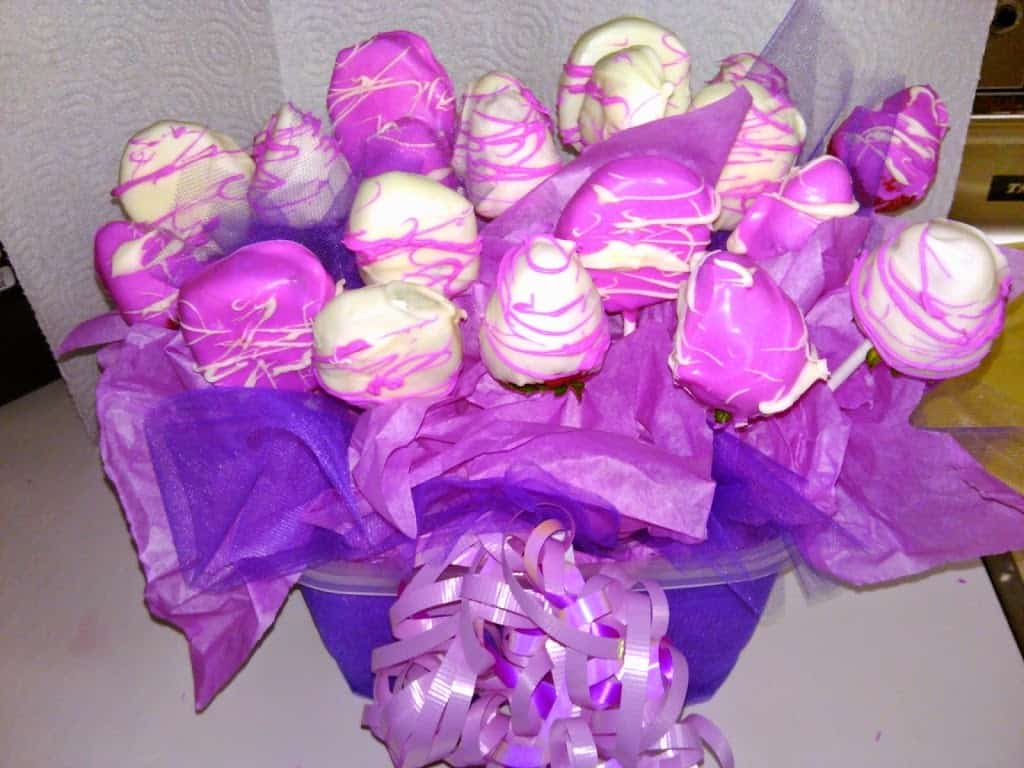
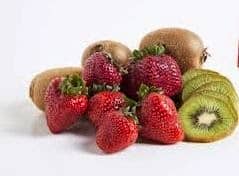
The one I’m showing you today is one I made for a special 14 year olds birthday. I knew she loved kiwi fruit so that was definitely going to be added in. I added strawberries to go with it because lets face it … strawberries dipped in chocolate are one of life’s perfect little treats!
Ingredients
The fruit: You can dip just about anything in chocolate. But just remember these few helpful tips. Make sure your fruit is fresh, washed and completely dry or the chocolate will not stick. If you have a juicy fruit (like the kiwi) and its almost impossible to keep it dry, try popping it in the freezer for about 30 minutes after you stick the skewers in each piece.
The sticks: Fruit is definitely good with out it being on a stick, but lets face it every thing tastes better when its on a stick (or wrapped in bacon, but that is another blog post)
Depending what your project is, that will determine what kind of sticks to use. You can get lollipop sticks in the candy making aisle at Michaels or Wal Mart. There are all different lengths to choose from. I’ve also had great success with just using regular wooden skewers. Also found at Wal Mart or possibly the dollar store too.
The chocolate: I prefer using the Wilton Chocolate melts for dipping anything. It melts more even, and has a nice glossy finish (much bore attractive for the over all look of the finished fruit) and it comes in MANY colors. You can also buy Almond bark in your baking section at Wal Mart. It comes in chocolate and vanilla only. You will have to add food coloring to this if you want other colors than brown and white.
Optional tools
Mini piping bags for decorating your dipped fruit (or a ziplock baggie with a TINY bit of one corner snipped off works just as good)
Sprinkles or candy sugar to add some pizzaz and sparkle
Wax paper – Its always good to protect your surface. Once it hardens, the chocolate easily lifts right off the wax paper without sticking to it.
Let’s get started!!
Instructions

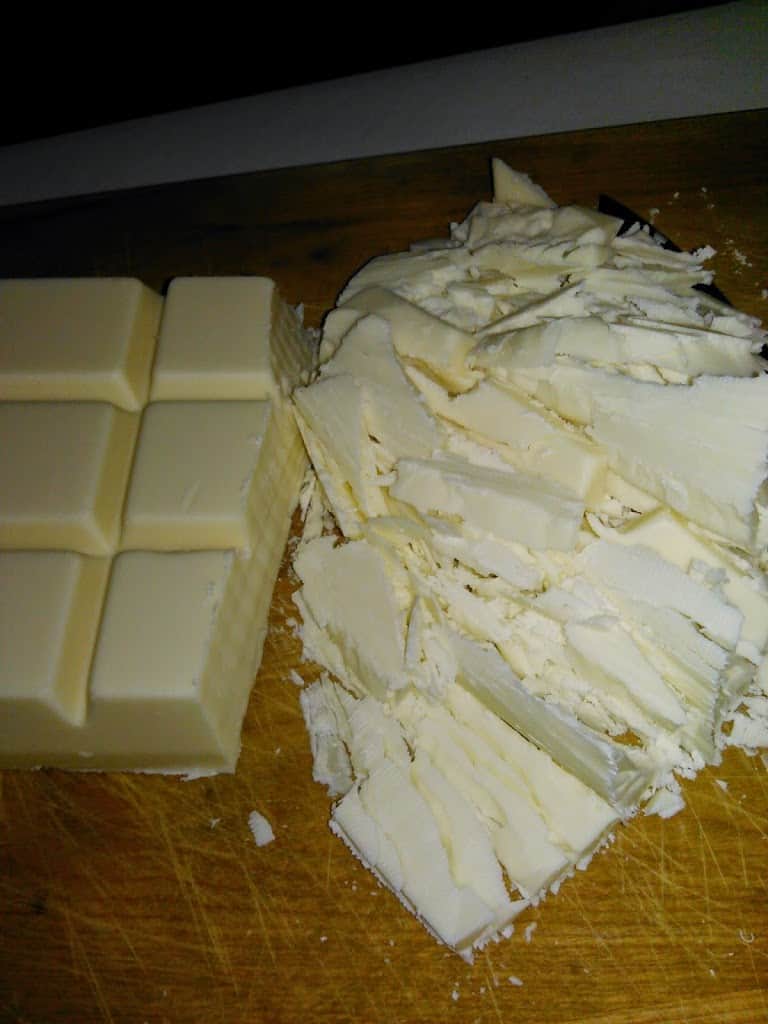
Pour about half the bag of the melting chips into a microwave safe bowl. If you’re using almond bark chop it up pretty fine before melting. The thinner you cut the chocolate the quicker it will melt.
Microwave on high for 30 seconds. Give the chips a stir. Continue melting in 30 second intervals, stirring after each time. Until the chips are fully melted. Do not just put it in for 2 minutes and then check it. Your chocolate will burn.

Once your chocolate is fully melted, take your clean, washed and dried fruit that should already be on the sticks if you choose to display them this way, and gently dunk the fruit into the melted chocolate. Tap the sides of the bowl gently to shake off any excess chocolate.
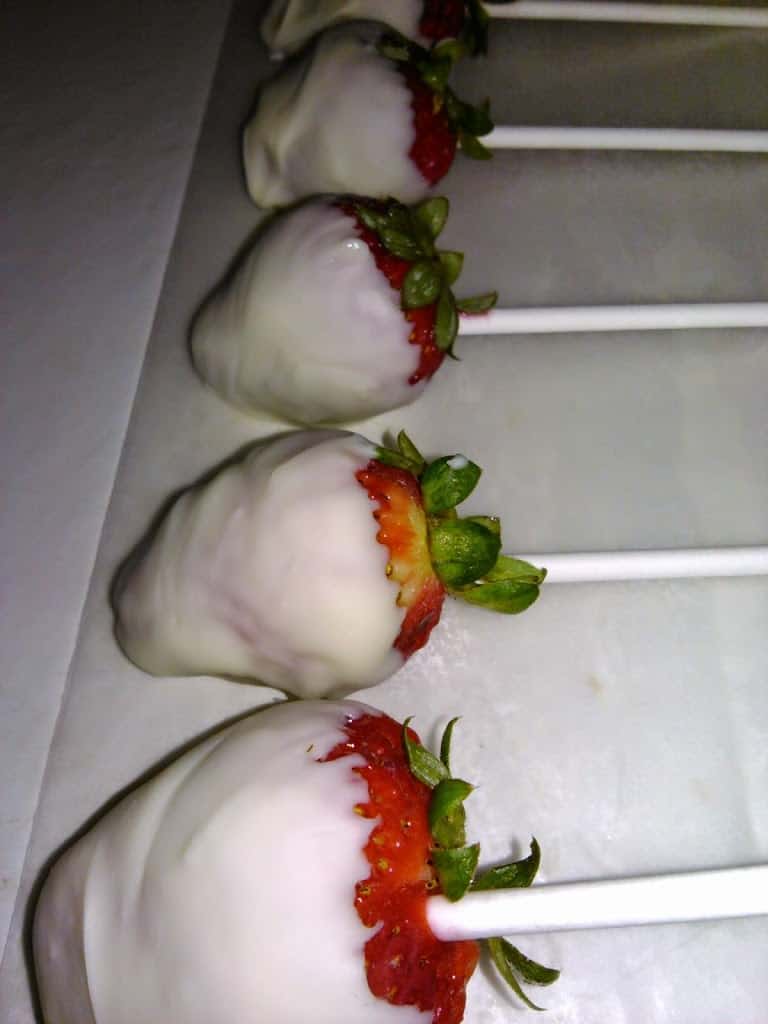
Lay the fruit on a sheet of wax paper to harden.
It will dry pretty fast. maybe 5 minutes tops. The perks of using this type of dipping chocolate for sure.
If your chocolate coating is t0o thin, go ahead and dip it a second time just to be sure the fruit is completely covered.
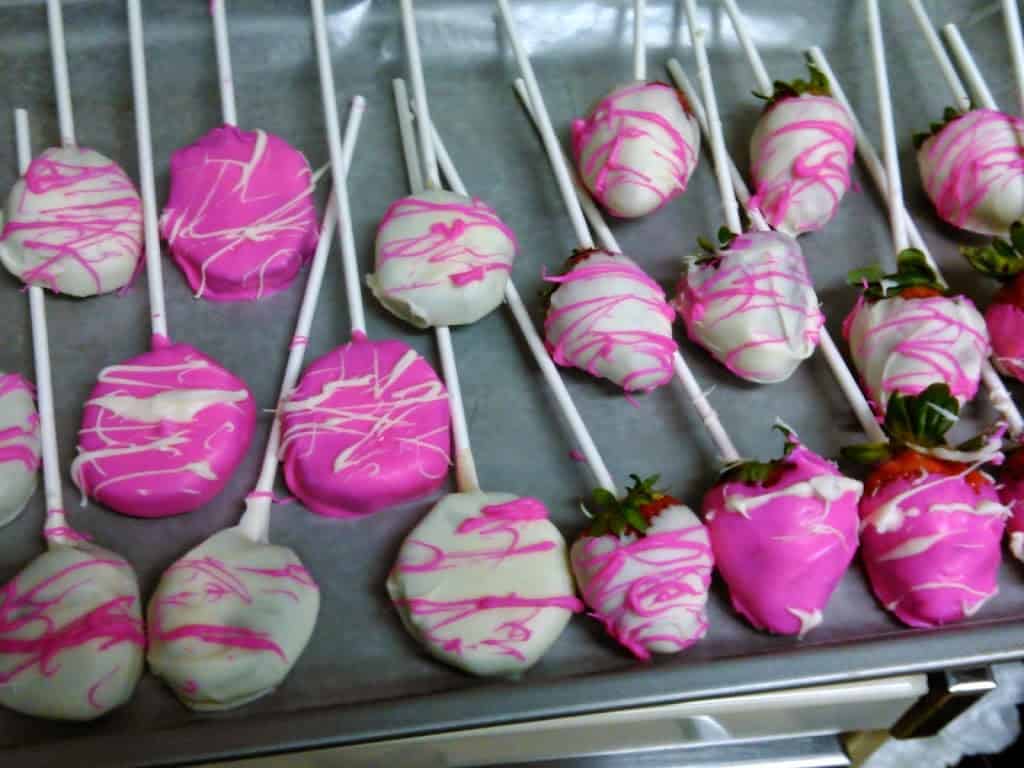
Decorate as desired with a contrasting color (melt also using the steps above) Add some stripes, or shake on some colored sugar or candy sprinkles while the chocolate is still wet.
If you are making an arrangement, I like to use floral foam or styrofoam blocks inside the base of your piece. If your base is light weight, glue the foam to the bottom or fill it with rice to keep it from tipping over.
Place the sticks into the floral foam evenly so it looks like a bouquet of flowers (the really yummy kind you can eat! mmmmm!)
To fill in any empty spaces, try using tissue paper or a few squares of tulle tucked in between the pieces of fruit. If you really want to go natural, Use fresh mint leaves instead of the tissue paper.
Why not make a mint Julep for the after party ! 🙂
I do hope these instructions were clear enough for everyone to understand. Sometimes I tend to ramble a bit and I forget that less is more. But hopefully, you can get past my babbling and make some beautiful pieces of scrumptious chocolate covered fruit.
- Fruit
- Sticks
- Chocolate
- Mini piping bags
- Sprinkles or candy sugar
- wax paper
- Pour about half the bag of the melting chips into a microwave safe bowl. If your using almond bark chop it up pretty fine before melting. The thinner you cut the chocolate the quicker it will melt
- Microwave on high for 30 seconds. Give the chips a stir. Continue melting in 30 second intervals, stirring after each time. Until the chips are fully melted. Do not just put it in for 2 minutes and then check it. Your chocolate will burn.
- Once your chocolate is fully melted, take your clean, washed and dried fruit that should already be on the sticks if you choose to display them this way, and gently dunk the fruit into the melted chocolate. Tap the sides of the bowl gently to shake off any excess chocolate.
- Lay the fruit on a sheet of wax paper to harden.
- Decorate as desired.