

Crafting a bright and colorful hot mess canvas is the perfect add-on to your spring decor. Not familiar with this crafting type? Here’s everything you need to know about hot mess Cricut canvas ideas and crafts!
Not only are they unique and original each time you make one, they are also super easy to create. You can personalize each piece with a fun, creative quote or design, that makes the perfect gift for everyone in your life.
Don’t forget to make a few for yourself, they look beautiful and match with any decor style. From hot mess to gorgeous art, you won’t believe how quick and easy they are to make.

Creating Hot Mess Critcut Canvas Projects
![]()
I am super excited to be partnering with 15 fabulous ladies to bring you another exciting month of the Craft & Create with Cricut Monthly Challenge! This month our theme is SPRING! You can see each Spring Cricut project at the end of this email. Be sure to check them all out, there are some incredible Cricut projects. As always these ladies never disappoint! My past Craft & Create with Cricut Monthly Projects
Buffalo Plaid Holiday Wall Art
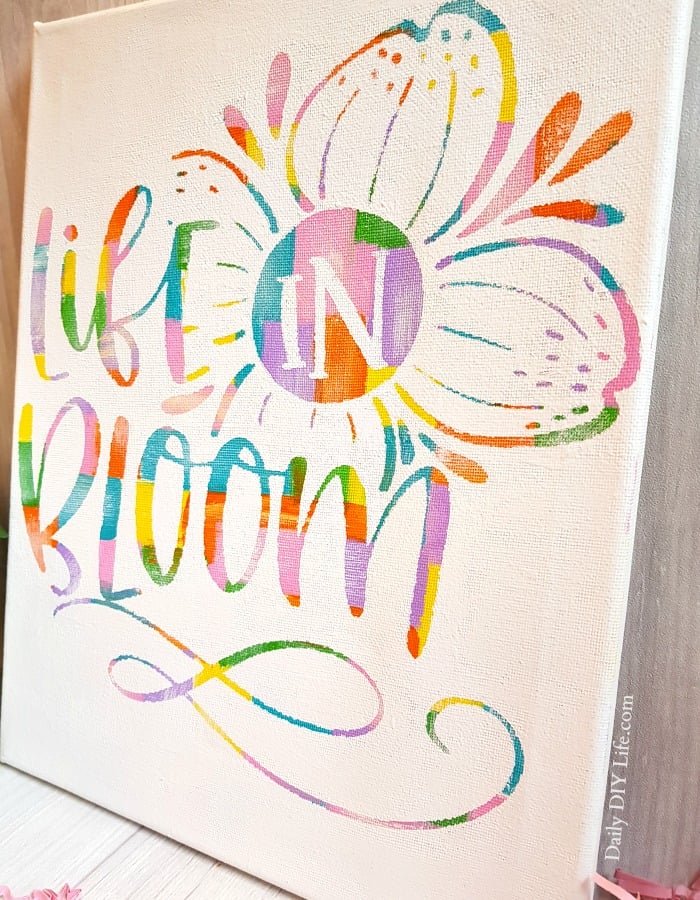
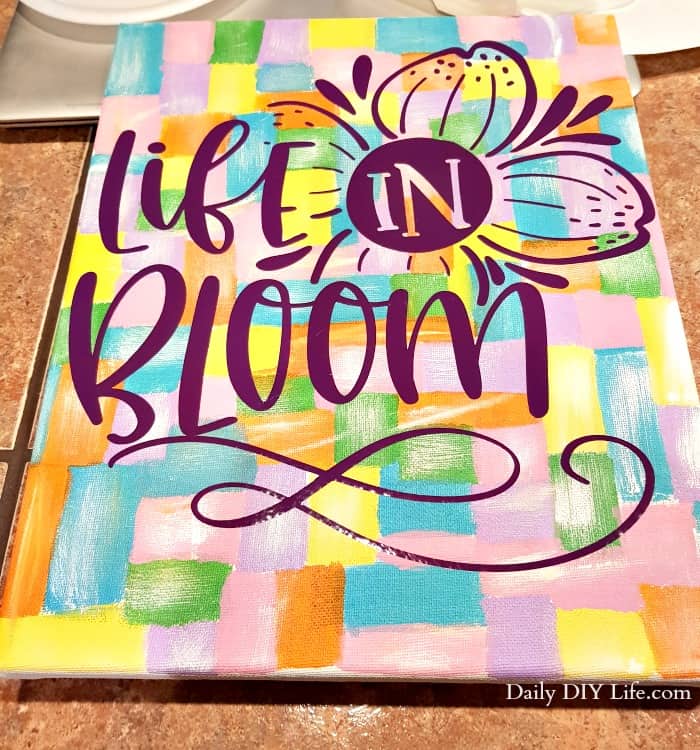
How To Create A Beautiful Hot Mess Cricut Canvas
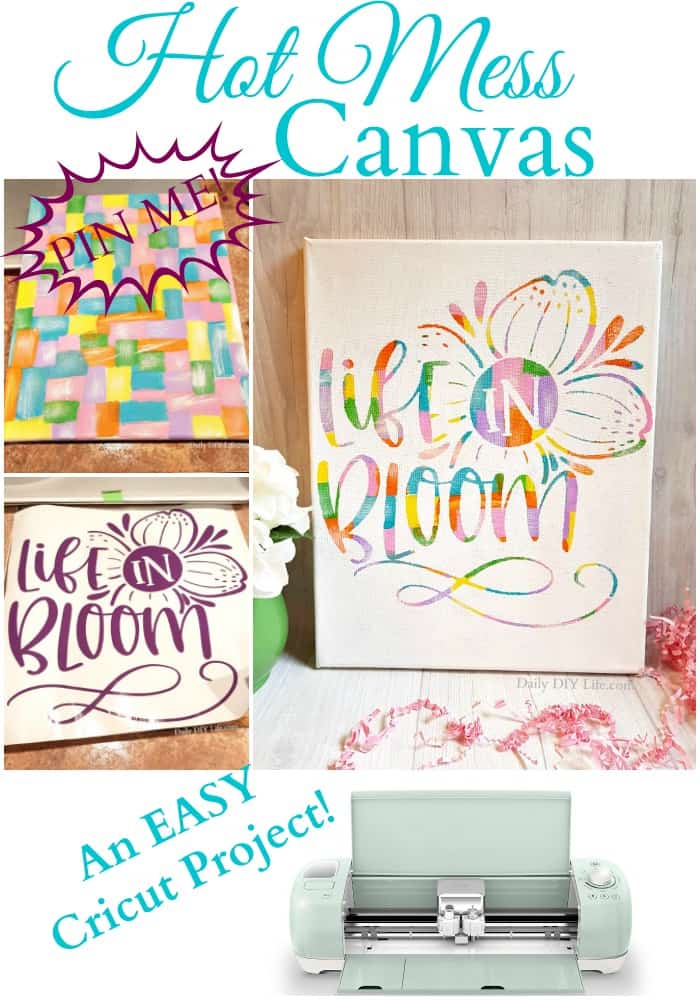
The hot mess canvas project takes me way back to when I was in elementary school. In art class, I remember taking all kinds of wild colors and scribbling them all over a white piece of paper. Once the whole paper was covered in bright vibrant color, we colored over it completely with black crayon. After the paper was covered completely in black crayon, we scratched into the black with a toothpick or paint stick (I can’t remember) to reveal all the bright colors under the black. That is exactly what this hot mess canvas reminds me of. Gosh, it sure does take me back!
Of course, we have upgraded our supplies to include paint, vinyl, and canvas, the concept is still the same. The outcome is stunning and gorgeous. From hot mess to beautiful art in just a few simple steps. Here is how we did it.
Supplies you will need:
- 11 x 14 Stretched Canvas

- Acrylic Paint in assorted colors
- Foam Craft Brush
- Cricut Explore Air 2 (or another comparable cutting machine)
- Cricut Scraper Tool
- Cricut Weeding Tool
- Transfer Tape
- 651 Vinyl (any color will do since this will be discarded)

 in assorted colors
 (or another comparable cutting machine)


 (any color will do since this will be discarded)
Directions:
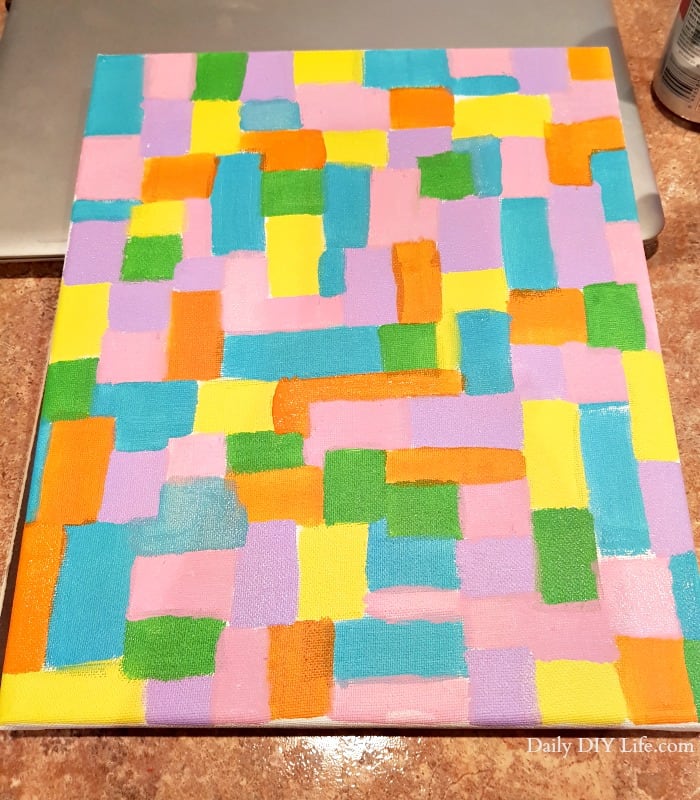
Using the colors of your choice that you want to show through the lettering, paint small squares or areas all over the canvas. This is the HOT MESS part of the Hot Mess Canvas. I like to keep the squares of color kind of small, this way more contrasting colors show through the lettering.
Follow Daily DIY Life on Pinterest!
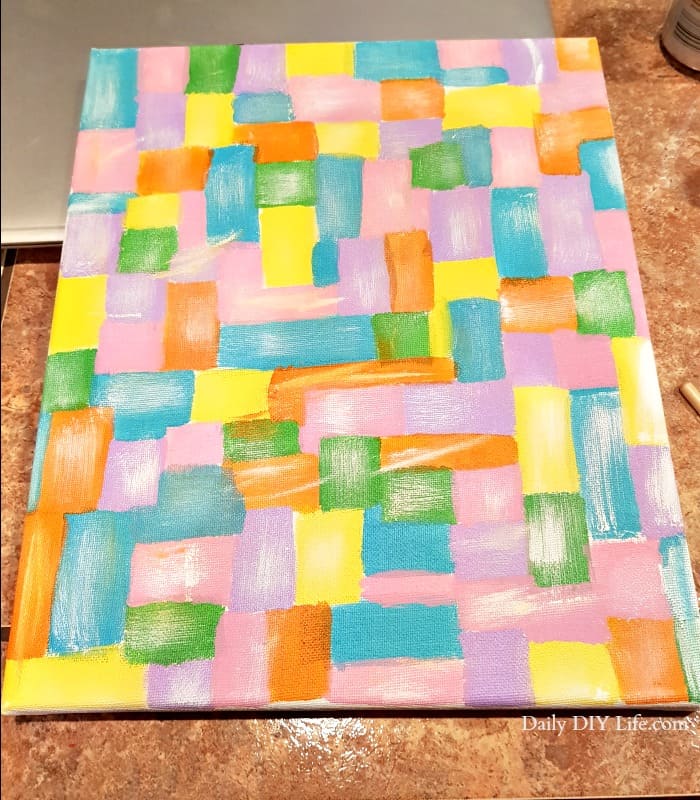
The colors I chose were just a bit on the bright side, so I toned them down by dry brushing a bit of white over all the colors. Not a lot, just enough to give them more of a pastel look.
Cover the entire canvas with color. Let it dry completely.
Hot Mess Cricut Canvas Ideas – Pin It For Later!
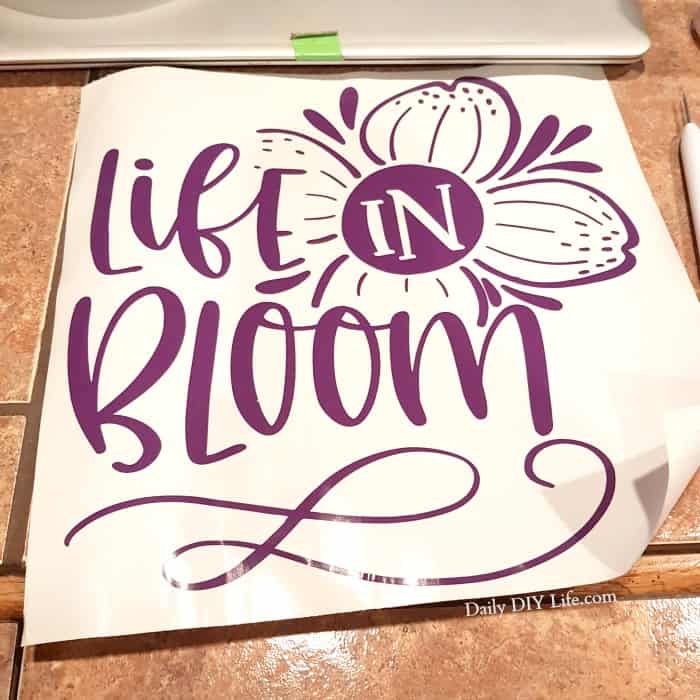
Choose your design in Cricut Design Space. Cut and weed all of the excess from your vinyl, leaving only what you want to show on your canvas. This image was found at Love SVG and was a FREE cut file. Get it HERE
Place your design on your canvas using the transfer tape. Use the Cricut scraper tool to rub the vinyl onto the canvas. I also flipped it over and rubbed from the back, since the canvas is in a raised frame.
Once the vinyl has stuck to the canvas, carefully remove the transfer tape. This may take a little time and practice, the vinyl can be a little stubborn when it comes to sticking to the canvas. That is why I like to use 651 vinyl, it has much more sticky than regular Cricut vinyl or 631 vinyl.
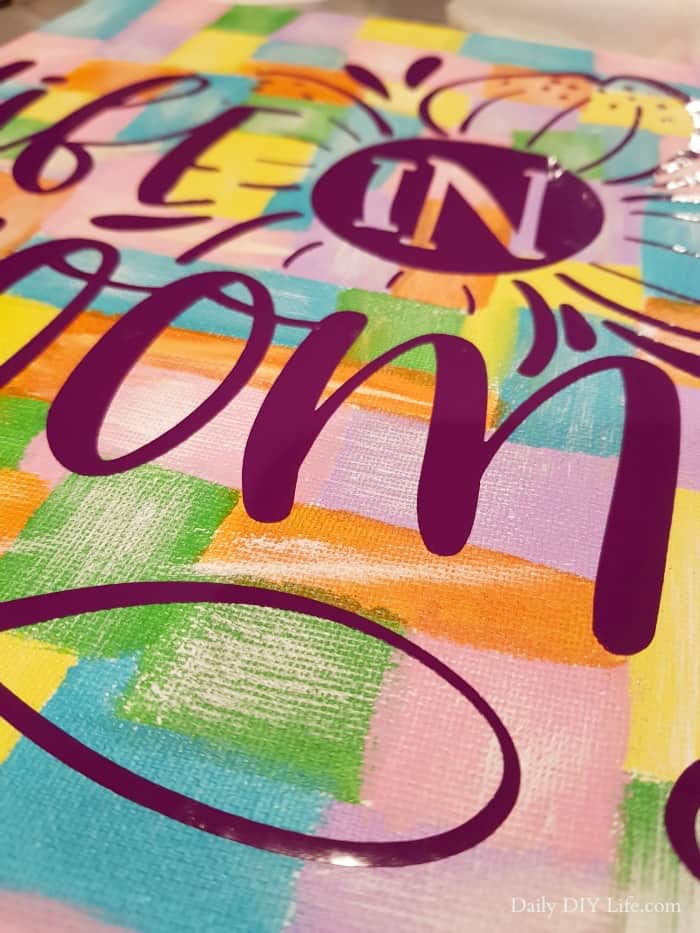
Once your vinyl is completely exposed and perfectly placed, carefully go over once more with the Cricut scraper tool just for good measure.
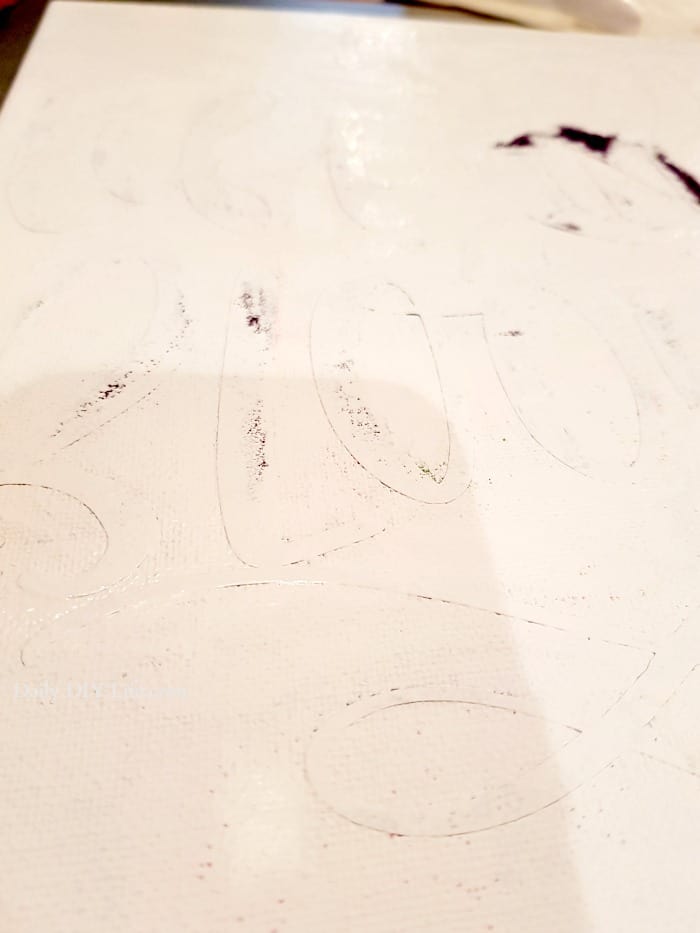
Using Your foam craft brush, go over the ENTIRE canvas with white acrylic paint. Taking care when you go around the edges of the vinyl. Don’t overload your brush with too much paint, it will seep under the vinyl and cause bleeding. Less is more, and you can always go over it with a second coat if it is not quite covered enough.
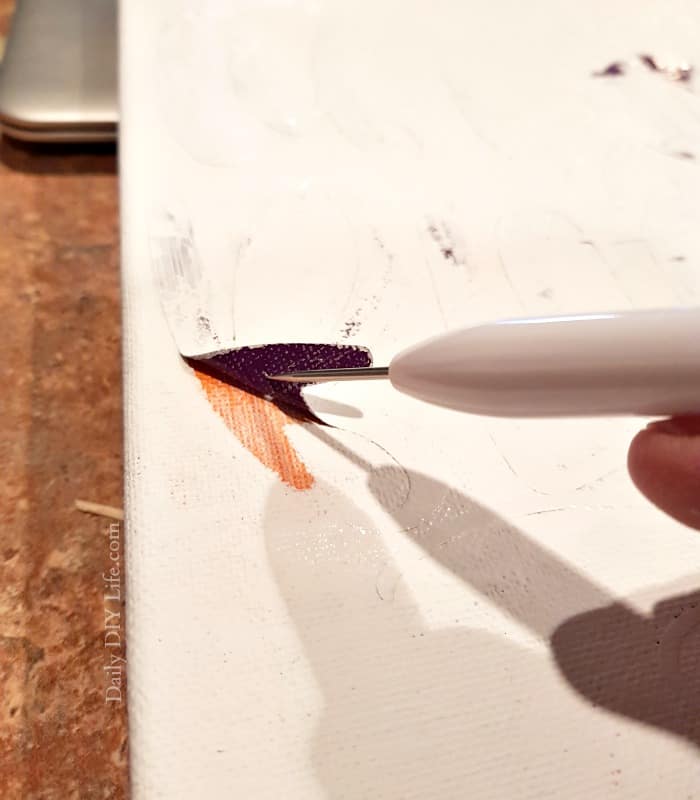
Once the top coat of paint has dried, peel up all of the vinyl to reveal you gorgeous Hot Mess Canvas work of art!
It so much fun doing this project for the Craft & Create with Cricut Monthly Challenge! I can’t wait to make more of these for every room in the house. This project is so simple, even the kids could do it. You may need to help them with the vinyl part, or they can just use sticker shapes to create a cool geometric design.
Craft & Create With Cricut!
Be sure to stop by and check out all 15 projects for this months challenge using the links below. So many creative and wonderful Cricut projects perfect for spring!

Weekend Craft | Doodlecraft | Create & Babble
Inspiration Vault | Refresh Restyle | Daily DIY Life
See Lindsay | Cookies Coffee & Crafts | The Kim Six Fix
A Turtle’s Life for Me | Upright and Caffeinated | PS I Love You Crafts
Our Crafty Mom | The How-To Home | Real Girls Realm
If you love this project, be sure to PIN IT using the image below.
This post contains affiliate links. That means if you click on a link and a purchase is made, we will receive a small commission at no extra charge to you. For more details, please see our Disclosure Policy.


Wow, your creativity is standout. Someday I’ll get a cricut and be able to do things too. For now, I keep you and your ideas bookmarked for the future.
I totally remember those scratch off things! This is such a neat idea and turned out beautifully! I am pinning to try this for myself!
I love this technique!! Too cute.
Love the colors & saying! So cute!
I LOVE this!! Seriously, I am going to make one this week!!! Thanks for the inspiration and tutorial! (And yes- I TOTALLY remember making a similar version with crayons as a kid ;))
I LOVE this technique, and I’ve never seen it before. I need to think of a project where I can use this. I love colorful artwork like that.
What a fun idea for both kids and adults to make! I remember exactly what you’re talking about from art class as a kid-such a blast to make. Have you ever tried stencil vinyl? I find that it’s easier to work with for painted sign projects versus regular vinyl.
Just wondering if you can use latex paint and 631?
Thanks!
I have never used latex paint to be honest. I would try a small test area to see if the 631 pulls it up. I would imagine it would be fine once it is dry since the 631 vinyl is not super sticky.
I should have read this post before I attempted to do a hot mess canvas. The painting part was fun. The vinyl part not so much. I had to put it on there individually so it didn’t come out right (and it bled through). I’ll try your method next time. Along with 651 vinyl because Cricut definitely doesn’t stick to the canvas.
I do not get nearly enough use from my Cricut. Saved this idea. Would make fun gifts to give.
Edited to add my most recent Hot-Mess Canvas. On this one, I added glitter while the paint was still wet.