
Homemade Christmas Ornaments are a huge hit around our house. When the boys were small, we made a new one each year and added our own personal touches to them. Now that they are older it is harder than it use to be to get them to sit down at the craft table with me. I will admit though, all 4 of my boys will still get crafty on occasion. Especially at Christmas time when mom is in the Holiday Decorating spirit. This year we decided to try our hand at making polish star ornaments. I am not polish, but these ornaments are just adorable and can be customized so easily to match your holiday decor.

We made these adorable polish star ornaments with three different types of paper to see which would be easier.
We first tried using scrapbook paper in a pretty cream and gold pattern. It worked great and I dont think it came out to bad for my first attempt.
Second we tried using white card stock. This was way to hard to work with and just wouldn’t curl around the pencil the way it needed to, so we scratched that idea.
Last we tried wrapping paper. Regular Christmas wrapping paper I believe we got at the dollar store. Wrapping paper worked perfect! better than the scrap book paper even.
Here is how we made one of our Homemade Christmas Ornaments this year ….
Paper Polish Star Ornaments
Supplies:
Wrapping paper, scrapbook paper or other decorative paper
Elmers glue
2 small beads or sequins
String or thin ribbon
Pencil – Sharpened to a point
Round stencil 3 – 4 inches in diameter (I used an empty ribbon spool)
A penny
Directions:
Trace your stencil and cut out (10) 3 – 4 inch circles (This will make ONE star)
Working with one circle at a time..
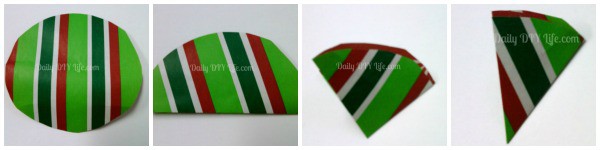
Fold the circle in half – The pattern you want showing facing out
In half again
In half once more
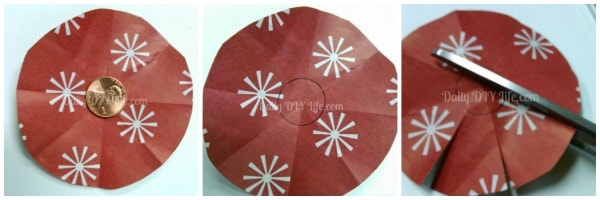
Open your circle and flip it over. Find the center point and trace the penny as close to the center as possible.
Carefully cut each fold line just until you reach the line where you traced the penny. Do not cut through that line.
Once you have all of the fold lines cut it is now time to make your points.
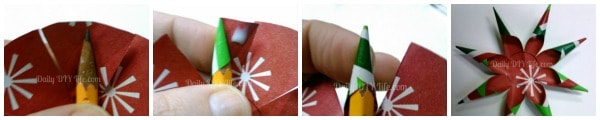
Place a pencil in the center of one of the sections.
Place a dab of glue on the corner of that section, and roll the paper around the pencil to form a point. Hold for a second so the glue will adhere. Remove the pencil and repeat for the remaining sections until you have formed them all into points. Repeat the steps above for all 10 circles.

Once you have transformed all 10 circles into star shapes it is time to assemble all of your pieces.
Using a toothpick or a skewer poke a small hole directly in the center of each star piece.
Cut a piece of thread 10 – 12 inches long. Thread one bead in the center of the thread. Bring both ends together.
Place your first star piece pattern side down onto both pieces of thread. The bead should stop the string from going right through.
The remaining 9 star pieces should be added onto the thread with the pattern side facing up.
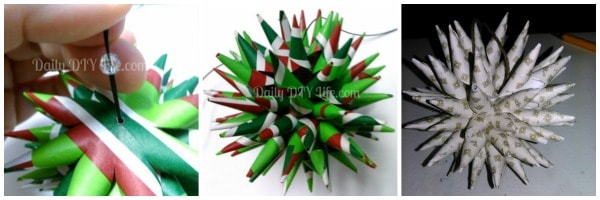
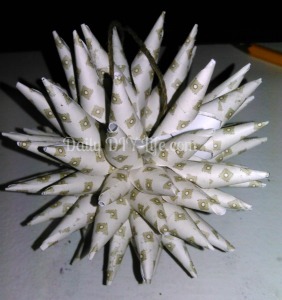
Once you have all 10 star pieces threaded onto your string, thread on the second bead on top of your star pieces. Once the bead is in place, separate the 2 strings and gently pull apart from each other. This is where the magic happens! All of those points will magically form perfectly into this adorable spiked polish star ornament.
Tie a knot as close to the second bead as possible to keep your ornament from coming un done. Tie a second knot a few inches from the bead to make a loop for hanging. Trim the ends and display as you wish.
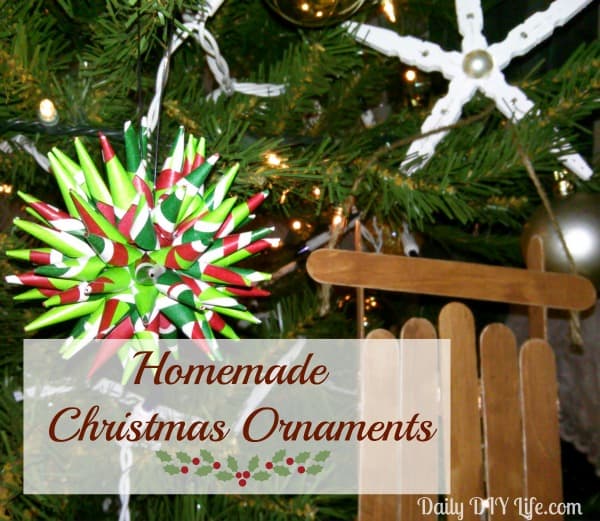
We have added these Homemade Christmas Ornaments to our tree this year. They matched perfectly with our Wooden Sled Ornaments and our Super Easy Star Ornaments. Here is all 3 together on our tree!
If you really want to glam it up, add some glue and glitter to the points after they have been rolled around the pencil and set to dry. Make sure the glitter is completely dry before assembling your ornament.
We had so much fun making these. These ornaments were a little time consuming to make, but the outcome was magical. Even the teens were impressed. That is a win in my book!
Do you/did you make homemade ornaments with your kids or grand kids? What are some of your favorite creations?
Be sure to sign up for our NEWSLETTER to get all of our Tuesday Tips , Recipes, and Projects right to your in box!
LIKE US ON FACEBOOK or FOLLOW US ON TWITTER to be the first to know when we add new goodies!

Wow they are so cute! I love the green and red one! Great job! Must have been fun to make with the boys!
Thank you so much. It was a fun project for sure.
love this star although I had never heard of it thanks so much for the great tutorial will have to try this with my nieces and nephews
You definitely should. We had lots of fun making these this year.
I have always loved these but I had no idea it was that simple! Pinning. Thanks for sharing on Merry Monday!
Thanks for pinning Rachel! Glad you enjoyed it.
I’ve pinned and will be sharing. I never knew this kind of shaped ornament was called a polish star. The way you did it with wrapping paper gives endless possible color ideas for this project to go with any tree theme.
Thank you Sue! It could certainly be worked into any decor. Even non-holiday as well. Thanks for pinning!
Like Your holiday star,have some Polish in me.Jeff Schwersinske
I am polish, I have been making these since I was seventeen, I am now 81 and I never knew they were called polish star. I always make them out of tissue paper, no need for glue as once twirled it stays. Tissue paper these days comes in so many styles, ideas endless. I just place each layer on top of each other and place on top of my wrapped gift then use a pushpin in centre…so easy